Learn how to make the perfect homemade pretzel that's crispy on the outside and soft in the middle. Follow my tips and tricks and have fun with various toppings to make a super fun snack!
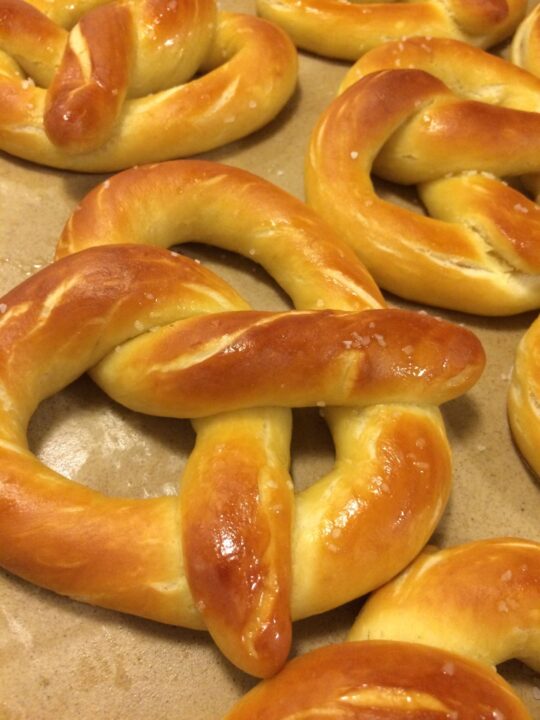
A great pretzel with a crispy exterior and soft center shouldn't be hard to come by or make. This recipe is easy and fun to make, giving you incredible homemade soft pretzels.
If you're wanting to have a quick and accessible snack, make a double batch and freeze some! You can reheat them at home and work easily and they're great even when not re-heated!
If you have kids, you'll want to try this recipe! Kids will have a great time helping to make these and choosing their own toppings. Plus, these are waaay cheaper than buying frozen pretzels or fresh ones from a stand.
Conventional Oven vs. Toaster Oven: Either one works well! Toaster oven time is a bit less so just keep an eye on them.
What Gives Pretzels that Well-Known Flavor?
If you've had a soft pretzel, you know exactly what I'm talking about. It's that addicting flavor that reminds you of fairs and rodeos, and that pretzel stand in the mall you always passed by as a kid.
There are 3 different aspects of the pretzel that combined, give you that incredible flavor.
Baking soda bath
While this step does help aid in the golden color, it also helps with the pretzely flavor we all love so much.
Butter
You can't skip brushing these with butter. No, oil will not do. If you don't brush them with butter than they will turn out paler, with a dry and dull exterior.
Salt
In the dough, and to top, you'll want salt. If you leave salt out of the dough you will miss the mark on flavor. Of course you can make the choice to omit kosher salt from the top and you'll still get a pretzel taste, but it'll be missing that extra oomph. This doesn't apply if you're adding different topping such as turbinado sugar or cheese.
Optional Toppings
Salt
Kosher salt makes for the most traditional topping. I wouldn't recommend replacing this with table salt or sea salt. Corse kosher salt gives the best texture and other salts could make it too salty.
Cheese
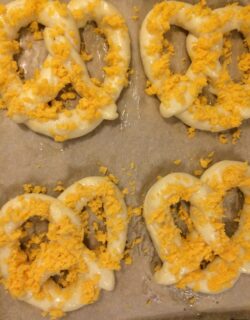
I'm a fan of extra sharp cheddar cheese. It provides enough salt and gives a great flavor. A mild cheddar works too but gives a much milder flavor.
Get creative with cheeses, just make sure they're shredded.
Turbinado Sugar
If you're wanting a sweeter topping this is a great option! Similar to kosher salt, it provides great texture and I wouldn't recommend replacing it with any other sugars.
Don't stick to the confines of what's "typical" for pretzels. Have fun with it and let me know what you try!


Steps to Making These Pretzels
If you take a look at the instructions below is may seem daunting. But once you read it over it's actually pretty easy and straight forward. I've provided details so you can be successful but ask questions in the comments if you have them!
Cutting out all the jargon, here are the basic steps:
- Make the dough
- Let it rise
- Cut into 12 equal portions
- Roll each portion into a long rope
- Shape the rope into a pretzel form
- Dip into a baking soda bath
- Brush with butter and topping of your choosing
- Bake for about 17 minutes or until as brown as you like them
- Enjoy with mustard, melted cheese, or anything else you can think of!
Tips and Tricks
Heating the Milk
Don't overheat the milk for one or it will kill the yeast. Dip your finger in and you should feel warm and not hot temperature.
I heat my milk on the stovetop and then transfer it to another bowl before adding the yeast. The main reason for using stovetop is it heats more evenly than a microwave. Transferring the milk to another bowl ensures that the milk won't continue to heat and you won't kill the yeast.
Size of the Rope
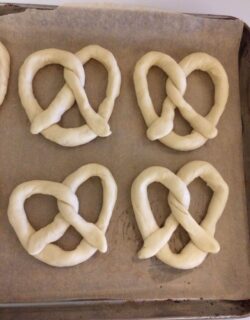
When you're forming your pretzel you can choose how large you want it just by making the rope shorter or longer. For my typical pretzels my rope is about 28"-30". In the images below the rope was shorter, about 23". The shorter the rope the less space there will be in the 3 holes or quadrants of the pretzel. Either way works great!

Twisting the Rope
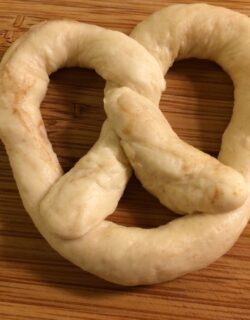
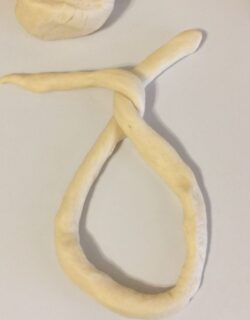
Hold each end of the rope and holding the rope in the air, quickly move your hands together slightly and that will cause the dough to twist.
You want the traditional twist as seen below. If your dough keeps whipping around, just lay it down on the counter and unwind it some.
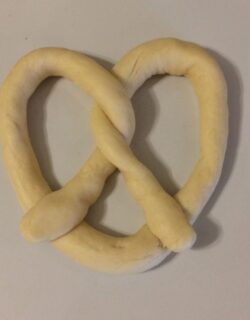
Hold the ends again and bring them down to attach at the bottom of the pretzel. Press down slightly. If they don't seem to stick, add a tiny bit of water under the ends.
Using this method helps keep the smooth shape of dough because you're not manhandling it too much.
Prepping Everything for the Pretzels
While the dough is rising prep your work station. Being organized will help save time and make the process much smoother.
- Choose your toppings and have them set out.
- Set out utensils needed: slotted spoon or spatula, basting brush, a knife/pastry cutter/floss for cutting dough
*Option to drizzle melted butter on with a spoon if you don't have a basting brush.
- Melt butter and start to boil baking soda bath before rolling out the risen dough.
- Clean a surface where you can roll out the long ropes of dough.
- Cover baking pan in parchment paper. Because you're dipping your dough in a baking soda bath that can cause your pretzels to stick more to your pan. If you're adding cheese that can also cause more sticking. Parchment paper is the way to go if possible.
Baking Soda Bath
Don't skip this step. I often see this step as "optional" in pretzel recipes but the bath is what helps give them their golden color and their true pretzel flavor.
I've also seen it recommended to leave the formed pretzel dough in the bath for an extended length of time. This is completely unnecessary and can lead to the flavor and color being negatively affected.
Gently lay the formed dough into the bath and leave it for only 3-4 seconds max. Gently remove with a slotted utensil.
Yes this is being precise, but using this method of hand placement below, I can keep the pretzel shape every time. I hold the pretzel with one hand on each side - gently pinching the top with my index and middle fingers and holding down the ends that cross over with my thumbs, ring finger underneath the thumbs. Figure out a way that works for you but this has been tried and true and I can be quick this way.
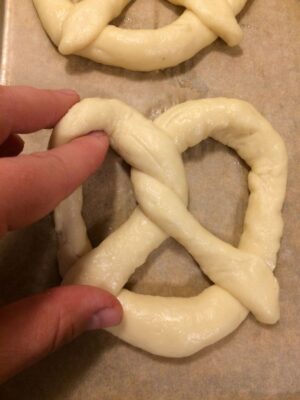
If you lose the pretzel shape when removing it don't worry, but quickly reshape. The dough will be a lot softer now and sticky and once it dries you don't want to mess with it any longer or it won't hold it shape and will likely tear.
Don't Slash Your Pretzels
I have seen it recommended to use a knife and make slashes in the pretzel dough to allow for expansion while baking. When I've tried this, I found that they expanded open along those slashes but also other areas along the pretzel. It gave too much of a cracked look for my taste and just doesn't seem necessary.
The oven temperature that I recommend allows the pretzels to cook slowly enough to rise evenly and they shouldn't be "busting at the seams" enough to need to slash them. As you can see in all my images they turn out great without using that technique.

Incredible Homemade Soft Pretzels
Ingredients
For the Pretzel Dough
- 1 ½ cups warm milk
- 1 tablespoon yeast
- 3 ¾ cups white flour
- 1 ½ teaspoon sea salt option to decrease to ½ ( you can always add more on top)
- 3 ¾ tablespoon unsalted butter
Additions
- 2 tablespoon melted unsalted butter to brush on top before bake
- kosher salt for topping
- optional shredded cheese for topping
For the Baking Soda Bath
- 3 cups water
- 3 tablespoon baking soda
Instructions
Make the Dough
- In a small saucepan heat milk on low heat for a few minutes. If you dip your finger in down to your cuticle it should be warm and not hot at all.
- While heating milk, in a large mixing bowl add flour, salt, and butter (room temperature but not to where you can squish it with your finger).
- Transfer warm milk to another bowl and add yeast to let activate for 5-8 minutes.
- Once the yeast has activated, add it to the bowl with flour mixture and combine. I use my hands.
- If you're splitting the batch to add different flavors do that now.
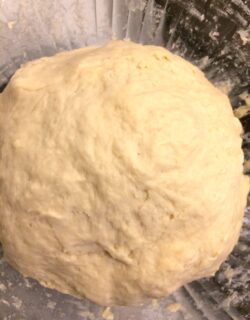
- Knead dough by hand for about 5 minutes until dough is no longer sticky. Place into a bowl and cover (with lid or cheese cloth). Let rest for about 45 minutes until doubled in size.
Set up Prep Station While Dough is Rising
- In a medium-sized sauce pan (wide and short is better that deep) add 3 cups water and 3 tbsp. baking soda. Find a utensil you can use to scoop out dough from bath like a large slotted spoon or slotted metal spatula.
- Make a clean work surface for rolling out dough and place toppings ( kosher salt, turbinado sugar, shredded cheese...) in small bowls.
- Prep cookie sheets with parchment paper. I'd recommend prepping 2 cookie sheets if possible or 1 cookie sheet and a pizza stone with parchment paper on top.
- Add 2 tablespoon cubed butter to a small saucepan to heat on stove or place in a microwave save bowl. Set aside a pastry brush for this step.
Once Dough Has Risen
- Melt 2 tbsp. butter on stovetop or in microwave but keep warm so it doesn't harden while you're forming your pretzels.
- Heat baking soda bath on medium heat and bring to a low boil.
- Preheat oven to 400℉. If using a convection oven you don't need to preheat.
Forming the Pretzels
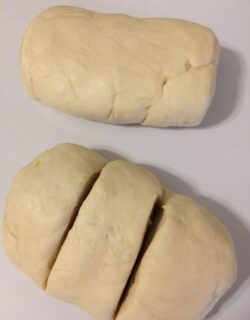
- Remove dough from bowl. If the dough is a little sticky don't worry, roll it around in your hands for a bit until it becomes soft and no longer sticky, but try to not add more flour! Form dough into a log shape and cut into 12 equal portions: *Cut log in half, then each section in half again, then each section into thirds *I like to work with ½ the dough at a time, reserving the other half in the bowl
- Find a clean work surface. I would not recommend flouring the surface (it makes it harder to roll the dough into a rope). 1 dough ball at a time, roll each portion into a rope about 24"-30" in length, keeping the remaining pieces in a bowl covered. If dough continues to bounce back just leave it for a minute and try again. Slap the rope on the counter to remove any bubbles and help stretch out dough. If dough is difficult to roll on your work surface you can manipulate it in your hands just be gentle not to break the rope.
- Pick up ends of rope and make a double twist (see images above in narrative). If it twists too much just unwind it. Lay it down on work surface and bring the ends down to the bottom and gently press down. Form 6 pretzels at a time (this is how many you should be able to easily fit on a cookie sheet).
- Place a dab of water where the ends of the rope attach to the bottom of the pretzel to make sure it's stuck together. Gently pick up 1 pretzel and gently place it into boiling baking soda bath for about 3-4 seconds max. Remove with a slotted spoon or spatula and place on prepared baking sheet.If your pretzel comes apart after the baking soda bath reshape it right away very gently. Make sure the twist in the middle is tight without gaps. However your pretzel looks now will be how it turns out after baking. After this point, you won't be able to reshape or fix it.
- Repeat until all 6 pretzels are dipped. Using a pastry brush, brush melted butter onto 1 pretzel at a time and immediately sprinkle kosher salt, cheese, or turbinado sugar on top. Repeat with remaining pretzels.
Baking
- Bake at 400℉ on the middle rack for about 17 minutes or until golden brown (my time is consistently 17-18 minutes). Convection Oven Option: Bake for about 12-15 minutes.
- Remove from oven and transfer to a cooling rack. If they stick, let them rest for a minute and be gentle with removing them.
- Repeat steps of rolling out ropes, forming pretzels, dipping in bath, brushing on butter and adding topping with remaining 6 pretzels. Make sure you don't place the 2nd batch of pretzels onto the same cookie sheet if the pan is still hot. Use another pan.
- Serve with yellow mustard or melted cheese!
- See notes for Storing

Leave a comment and rating, I'd love to hear from you!